Wednesday, November 30

Dusk at RSPB Old Moor


Tuesday, November 29

It was a pea year

Despite some failures I would class 2016 as a good year for peas. 
We had one complete failure, Delikett - a sugar snap variety didn't produce at all and the other sugar snap - Oregon Sugar Snap - and mangetout - Delikata - varieties sowed at the same time and in the same bed didn't fare much better.

The seeds germinated but due to weather conditions, the seedlings grew very slowly and were ravaged by pea and bean weevils.
Our pea and broad bean plants usually attract the attentions of these weevils which feed on the leaves of the plants. The nibbled leaves have U-shaped notches around the edges. Most years the plants outgrow the damage but last spring the slow growing seedlings just couldn't cope. We did manage to hartvest a few mangetout.
We also had poor results from peas sown in another bed on the 9 June. This bed though showed evidence of the soil being disturbed so maybe mice or some other hungry creatures dug up the seeds.

Despite these setbacks in other ways it was a good year for peas and we had a decent harvest and were able to stock up the freezer.
As you can see from the table we rely heavily on Onward, so much so that we bought a large bag of seed.
We sow all our peas directly in the soil. We have tried sowing in pots and transplanting but it never seems successful which is strange as it works for sweet peas.

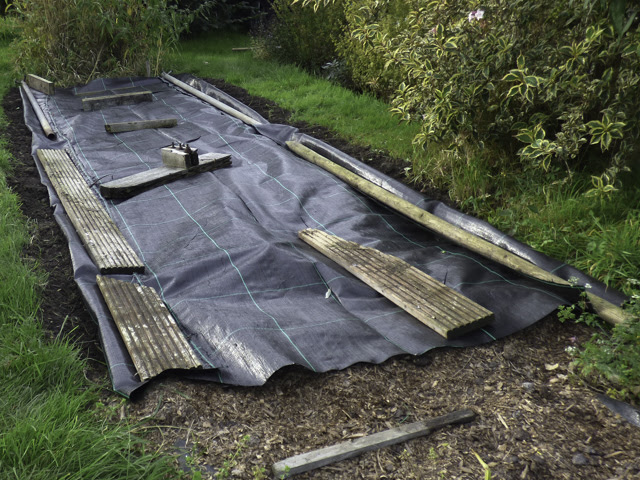
As you can see above we sow into trenches cut in weed control fabric. You can also see that we pay absolutely no regard to seed spacing and sow very generously to allow for poor germination. Now you understand the need for the large amount of seed. The hazel twigs are an attempt to prevent animals such as cats and foxes from walking all over the newly sown seed beds.
The first lot of Onward were sown on 5 May, a few days before the devastated sugar snaps and mangetout but these were unfazed by weevils. There was evidence of nibbling but the plants grew away strongly.

They were grown in a double row and  supported by hazel twigs.
The next sowing on 9 June was the row that germinated poorly. I did furtle about in the large gaps in germination and didn't find any seeds. I resowed the bare patches but the second sowings fared no better which is why I suspected mice.

Due to this failure, on 13 June we sowed another long row in a fairly rough area of the plot, alongside a row of late sown annual flowers.
To be honest after the previous sowing I didn't expect much from this row but they did really well. What's more we didn't find as many pea moth grubs as normal which is appreciated when it comes to podding.

As we still had some pea seeds left we decided that there was nothing to lose on using up the seeds on a really late sowing on 17 July. We planted a row in the bed that had previously housed our early Casablanca potatoes. These germinated well but by the time the pods had filled the plants had begun to suffer from mildew and the pods began to blacken.
I was going to write the row off but decided to check the pods first and found perfectly good peas inside.

There is always room for improvement so next year:
  1. I think I will cover the newly sown peas with enviromesh in an attempt to thwart the weevils, that is unless they are ready and waiting in the bed. 
  2. I'm not sure whether this is enough to keep mice away or whether I need to use some wire netting for the later sowings.
  3. I also found that a single row was easier to harvest than a double row as I could get along each side easier. The two rows planted side by side tended to mesh together.
  4. We maybe need to plant a second sowing of mangetouts or sugar snaps.
  5. Finally we will try to remember to use up the remaining pea seeds a little earlier that we did this year, maybe the end of June, to try and give the latest sowing a better chance to do well.
Of course it isn't as simple as that is it? Next year could be completely different.


Sunday, November 27

At least the robin came to say hello

It was a typical visit to the RSPB reserve. The water birds kept their distance.
 The kingfisher deserted its post just as we arrived.
The starlings gathered on the pylon ...
 ... but the expected murmuration was a mere series of murmurs.
Can you spot them?

The returning geese provided more of a noisy spectacle.
But at least a friendly robin came to say hellop.

Martyn's video


Saturday, November 26

We don't put all our eggs (potatoes) in one basket.

This year we grew eleven varieties if potatoes. It sounds a lot more potatoes than it is as we only had five seed potatoes of six of the varieties. A local garden centre held their version of a potato day and we had the opportunity to just try a few varieties that were new to us. This way if there were any that we didn't like we wouldn't have wasted too much space on the plot and time. On the other hand if we liked a variety we could add it to our main list next year. As it happened both these scenarios occurred but more of that later.
Our main choice varieties were supplied in 2.5kg packs which have between about 25 - 35 seed potatoes depending on size.  Usually we use up the small seed potatoes by planting two to a hole.
Our choice of early potato was Casablanca. This was the only variety not to be planted through weed control fabric. The tubers were planted with a trowel and earthed up in the usual way. As roots of the early potatoes are dug as needed before the tops have died back the use of weed control fabric would make harvested more of a problem.
As you can see from the above chart in spite of being an early variety, Casablanca was our best cropper. It produced a good harvest last year too and it also scored highly on the taste test. It easily earned its place in next year's list.

We planted up the trial potatoes in one bed and the rest of the varieties were planted in two large beds. All were planted through weed control fabric.
Although it would appear that the variety grown without wcf fared best, this is just a coincidence. Last year we did a controlled test and found that the potato harvests were not affected by the use of wcf.

To compare the yields I multiplied the yield from the trial potatoes by five. Of the trial varieties Amour produced an excellent crop and had hardly any damage to the potatoes.

Martyn's comment after lifting the Blue Belle harvest was that it was hardly worth digging up. This is one that will definitely not feature on next year's list.

Orla produced a good crop which had little slug damage and Setanta a red skinned variety performed similarly.

Valor produced an excellent crop but the potatoes were badly affected by wireworm damage.

Vivaldi produced a crop comparable to Kestrel and the potatoes had little slug damage and it also impressed in the taste test. Kestrel too was almost completely free of any slug damage.

We were not impressed by Vales Sovereign. The crop was very badly affected by blight so to all intents and purposes was a failed crop. Nadine which was growing alongside Sovereign was completely damage free and produced an OK crop. Last year Nadine only had minor slug damage so seems to be a reliable choice but Vales Sovereign is definitely off next year's list.

Winston was on a par with Setanta and Orla cropping wise. Last year Winston was badly affected by early blight but escaped this year. The variety was given a second chance on the grounds of its taste.

It's always difficult to recommend varieties of potatoes as the taste and performance varies according to soil and the conditions that prevail during the season so the above are only meant to describe how things went for us. 

We will be looking out for potato day again so we can try more different varieties. Anyone else trying something new or are you sticking to tried and tested?

Wednesday, November 23

Pumpkin Pie with a ginger biscuit crust


Tuesday, November 22

Controlling weeds part two - vegetables

Having successfully deployed weed control fabric to fruit beds our attention turned to the vegetable beds which in theory should be easier to deal with as they would be empty when the fabric was laid.

At this point I should mention that the fabric we buy is 100g and not the cheaper 50g. We found that the cheaper fabric wasn't effective. We also buy widths suitable for our beds so that we can avoid cutting and fraying as much as possible. Where the fabric is slightly too wide we fold the edges rather than cutting it.
Having laid the fabric we had to decide how to hold down the outer edges. We tried wooden planks but these provided a slug hiding place. We tried tucking the edges into the soil but this meant that weeds grew in the soil around the edges. Finally we decided on laying the fabric flat and mulching either with wood chippings or well rotted manure.

Next how to plant through the fabric? We have two basic methods. The first is to cut crosses in the appropriate planting positions. The spacing varies depending on what will be grown in the bed.
In the case of brassicas the crosses can double as cabbage root fly protection.

In the case of other crops the flaps can either be left as for the brassicas or tucked back underneath the fabric as in the case of potatoes.
This method allows more space for the potato, which is planted as deeply as possible using a trowel, to push through. Our earliest potatoes are not planted through w.c.f. as roots are harvested individually when needed and this is less easy when covered with fabric.


The hole planting method is used for.
sweet corn
Broad beans, outdoor tomatoes,courgettes and squash.
A slight variations is also used for climbing beans. The canes are pushed into the planting holes.
Our second method is used mainly for directly sown seeds and is potentially more destructive as the fabric does fray after a while.
A flap is cut in the fabric as shown in the dotted lines on the diagram above left. We have found that the second method and cutting several flaps instead of one long one makes the fabric easier to move in subsequent years. The flaps are folded back under the fabric and if seeds are to be sown directly a trench is scooped out and filled with compost. Sowing directly into our soil is only really successful for peas - see the photo below. The wooden planks in the photo above right are temporary until the fabric is mulched.


I tried using pinned down canes to hold down the edges but this does't really work and so we now use metal pegs.
The black plastic pegs don't work as well as the metal alternatives which are also easier to remove.

The trench method is used for:
Onions and shallots
Parsnips
Peas and sweet peas
Carrots
Lots more besides such as annual/biennial flowers, beetroot and salad crops are gown using this method. The trench width varies with the crop for instance peas are given more space.

We grow leeks using this method too - we tried growing in a hole but they proved too difficult to harvest.
Leeks
Once the crop has been harvested the fabric is removed, the ground is dug over and any weeds that have managed to push through are removed. The bed is then covered again for winter.

The following season the fabric is rotated with the appropriate crop at planting time or if convenient this is done after clearing the bed in autumn.

As well as controlling the weeds which is beneficial to crop growth,  I think the fabric has other positive effects. The colour absorbs warmth and so must help in warming the soil early in the season and also must help reduce moisture loss in summer.

I just wish we had started to use  w.c.f. earlier when we were both working full time. During the growing season with things to plant and crops to harvest the weeds used to have a free reign - not anymore!


Sunday, November 20

My choice of camera

Several times I have been asked in blog comments what type of camera I use so I thought for my second photography post I would explain which camera I use and why I choose to use it or in my case them.

I have two cameras that I use regularly. Both are Panasonic Lumix cameras so why two. The short answer is that each has an advantage over the other in certain areas. 
The camera that I mainly use at the allotment is a Panasonic Lumix DMC-FZ72. This is the camera that I have had the longest and I was quite happy with it until Martyn bought a higher spec. version and I found it could do some things better than my camera

Then Martyn decided he wanted something that was better for video and suggested that I use his 'old' camera which is another Panasonic Lumix but this is a DMC-FZ1000.
Both, being bridge cameras, have just one multi purpose lens which suits me fine as I don't want to have to carry extra lenses about and I just know, whichever lens I had on the camera would be the wrong one at the time. Some things just won't wait for you to change lenses!

The FZ72 lens has a wider range than the FZ1000. It's lens has a range from a 20mm wide angle to a 600mm optical zoom for a sharp image. (If like me this doesn't mean much to you it zooms the image up by 60x). It will zoom up to 1200mm digital zoom but the image ends up less clear. The FZ1000 has a range from 25mm wide angle, up to 400mm on optical zoom for a sharp image and 750 mm digital zoom. I'll be posting on this later.

There are features of the FZ1000 that I like. Very sunny conditions cause a problem with the FZ72. It's difficult to see the image in the viewing screen and the view through the viewfinder isn't very good especially for someone with my eyesight.
The FZ1000 presents a larger image through the viewfinder and using it is generally more comfortable. You can also adjust the view to suit your eyesight.

The viewing window on the FZ72 is fixed but the one on the FZ1000 is mobile.
This means that not only can the viewfinder be adjusted away from direct sunlight but it is easier to take photos in awkward places.

Another advantage of the FZ1000 is that I use something called burst mode a lot when I am taking photos of wildlife or taking train photos for Martyn. (I'll get told off for calling them trains as he always refers to them as locos). I'll explain more about how I make use of burst in another post. On Auto mode the FZ72 takes three images and that is it until you press the shutter button again whereas the FZ1000 just keeps on going until you release the shutter button.
There is a disadvantage that these cameras have and that is that they don't look as impressive as those DSLR cameras with huge lenses but on the plus side I can actually hold one to take photos. I once tried using a DSLR with a telephoto lens that didn't zoom any more than my camera. The length of the lenses was incredible - it looked impressive but it weighed a ton. I would have had to use a tripod with it which is something that I find too restrictive. I found it incredible that this monster lens didn't magnify the image any more than my modest looking camera.

So generally I use the FZ72 on the plot and take the FZ1000 when we are out and about. That is I will unless Martyn asks for it back!

I know more and more people use their iPad or iPhone when taking photos but I haven't got into this. It would have been interesting to say the least  trying to take a photo from the top of the keep of Richmond castle with the strong winds. Holding up an iPad would have been a real challenge.
Martyn uses his phone to take photos when he hasn't a camera with him but I guess I am just an old fashioned girl who likes to hold a real camera. 

I know there are developments afoot that will potentially change the shape of the camera - such as this one. New technologies seem to be looking at combining the convenience of mobile devices with the functionality of 'traditional' cameras. Maybe one day I will be convinced. Has anyone used something like this and can persuade me that they are 'the way to go'?